How to espalier
The art of espalier is the training of trees or shrubs in a formal or informal fashion, usually against a wall or a fence. Freestanding designs, where the tree is trained to stand alone (as in a formal cone-shape), can also be termed ‘espalier’. Espalier growing has been practised throughout Europe for centuries, with many fine examples in existence.
Espaliers are by no means restricted to back garden fruit trees; deciduous flowering and ornamental trees are also suitable for espalier training as well as fruiting trees. Beautiful flowering trees (especially the flowering cherries and crab apples) are stunning when espaliered along the side fence or a courtyard wall, creating a most interesting and unusual specimen.
For the enthusiast who is looking for an unusual ornamental espalier, we suggest Cercis, Laburnum, Lagerstroemia (crepe myrtle), Malus (crab apple), Parrotia persica, Prunus (flowering almond, apricot, cherry, peach and plum).
Design
Space Saving
Deciduous trees are especially suited to espalier. Depending on the design chosen, an espaliered apple can require as little as one-metre width and 300mm depth. They are excellent for a situation where space is limited, such as along a driveway that runs very close to a neighbour’s fence, or to make use of maximum space on walls, fences or trellis.
Apples and pears are the easiest fruit types to train and the most intricate designs can be created. Their wood is supple, allowing them to be manipulated successfully. When training an espalier on fruit types with more brittle wood success is more likely to be achieved if the shoot is tied down regularly while it is growing and still young and supple. Plums also have supple wood and can be trained to most espalier designs.
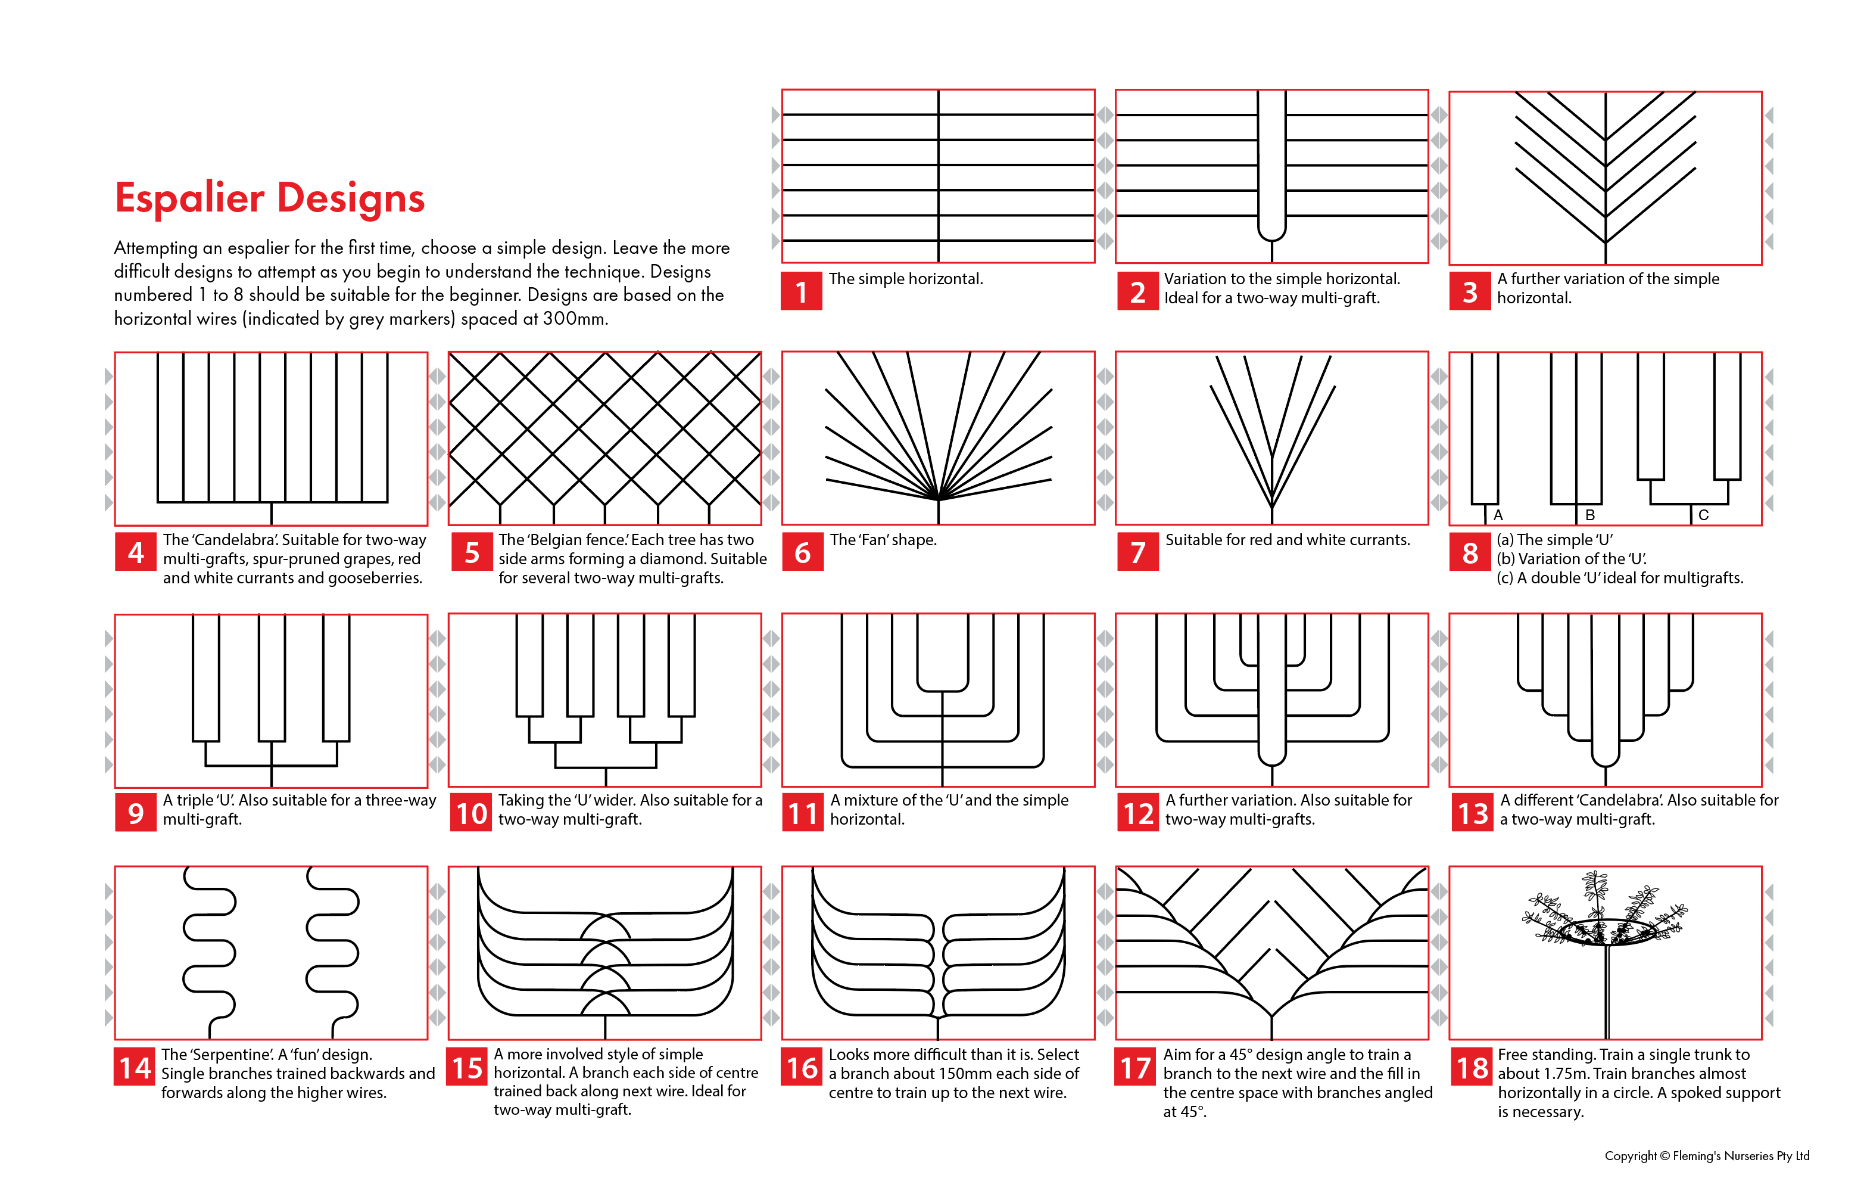
Cherries grow rapidly, producing long straight branches which can be difficult to train to any shape other than the most basic design. We recommend that cherries be restricted to designs numbered 3, 5 and 6. These designs are simple and cherries should be successful if branch angles are not greater than 45 degrees from the perpendicular.
Peaches, nectarines and almonds also respond best to simple designs. They produce strong branches which do not adapt well to tying down to the horizontal with the many vigorous, vertical ‘water shoots’ becoming a problem.
Apricots, whilst they produce strong branches, adapt well to a range of designs.
Grapes (design 4), gooseberries (designs 4 and 7), red and white currants (designs 4 and 7), medlars and quinces are all suitable for espalier. Raspberries, while not suitable for the formal training of espalier due to their pruning requirements, can be grown along a fence line or in a narrow area.
Design
If attempting an espalier for the first time, choose a simple design on which to learn and we suggest that you leave the more difficult designs to perhaps when you understand the technique better. Designs 1 to 8 are suitable to gain experience.
Construction
The support fence or trellis
Prepare a fence line that is strong enough to support the tree (and crop) during the early years, until it can support itself. A section of a sturdy paling fence is ideal and a series of horizontal supporting wires, approximately 300mm apart should be fixed to the fence up to about two metres in height, with the lowest wire being about 300 to 450mm above ground level.
Other types of fences are suitable, but be aware that heat reflecting from a brick wall or metal (corrugated iron) fence, particularly those facing north, can cause sun scorching to the tree and fruit. If such a position is to be used, then build a strong, free-standing fence about 300mm out from the wall or fence. This will help prevent the espalier scorching.
Before planting
It is important to decide exactly which espalier design to use before you start, so that you can attach a design to framework on the wires.
Thin dowelling (10mm to 12mm) or thin bamboo are suitable to use as vertical or angled supports and having these in place from the start, makes the design much easier to follow, like a road map.
The tree
The ideal tree to train as an espalier does not have too many branches, although if a branch is in the wrong place it can simply be cut out.
For the simple horizontal (design 1) select a tree with the potential of having two side branches to tie down to the bottom wire and one branch growing vertically to be cut off at the second wire.
You can improvise with a tree that has many branches by simply cutting out those branches that are not required. Remember that fruit trees are generally very hardy, especially in winter when they are dormant.
The aim of espalier is to produce as much fruit as possible along a series of ‘mother’ branches which follow the planned design.
Planting and training a basic horizontal design
Plant the selected tree in the middle of the space allocated. If you have selected a tree that has three branches, then one could be tied down to the wire on the left, the other to the wire on the right, leaving the third branch (the most upright branch which is to become the trunk) to be cut off at the second wire.
The branches that are tied down to the left and right should be shortened (after they are tied in place) to encourage new growth. As these side branches grow (we’ll now call ‘mother’ branches), they should be gently but firmly tied to the wire when the shoot reaches 200mm or so in length. Cut the trunk off (firstly making sure that you are leaving three healthy buds below the cut). As the tree grows (see immediately below) concentrate on training these buds to the left and right and upwards towards the third wire.
Train the two lower buds along the second wire to the left and right, leaving the top bud to grow up to the next wire as an extension of the main trunk. When tying the branches down to the horizontal don’t force the branch near where it joins the trunk (it may split). Gently pull the branch down from higher up where it is more flexible and gradually (over a period of weeks) bring the tie in closer to the trunk along the wire.
Apples, pears and plums
Fruit is mostly produced on ‘spurs’ which form on second-year wood. These spurs continue to produce for many years and should be regarded as permanent fruit spurs. Encourage as many spurs to the form on the ‘mother’ branches as possible.
Watch for ‘water-shoots’; they grow vertically and are easily recognised by their vigour. As the ‘water-shoot’ takes off vigorously from the horizontal ‘mother’ branch, it can be tied or weighted down to assume a more horizontal pattern. When they reach approximately 300mm in length they should be nipped back (‘stopped’).
After a few weeks, when the water-shoot has ‘stopped’ and the wood at its base has hardened, it can be cut back to two or three buds from the ‘mother’ branch. The remaining section should form into a fruiting spur the following season.
Some of these fruiting spurs can be cut out if they are growing too close together causing overcrowding, as they constitute the fruit bearing areas of the tree. If you imagine each spur producing an apple and the spurs spaced at 150mm along the branch, then you will understand the potential fruit producing area that exists along the ‘mother’ branch.
The very nature of growing conditions in Australia makes controlling rampant growth difficult. Remember that you are training the trees away from their natural habitat, so patience and perseverance is required. Usually, because our conditions are so ideal, the ‘stopped’ branch takes off again and resumes its upward growth, but this time with a few more shoots alongside. If your tree is growing with this vigour, we suggest that you tie the ‘water shoots’ down to the horizontal instead of cutting them back to two buds (and encouraging them to grow again). This should slow them down quite considerably. Cut them back in the early winter to about 300mm. Spurs should set during the following year providing the branch is not too vertical.
Peaches and nectarines
The fruiting wood of peaches and nectarines is the wood that grew in the previous season. These are called one-year-old laterals and you need to keep new laterals growing from the ‘mother’ branches each year, to keep the fruit close to the strong branches.
To espalier a peach or nectarine, it is necessary to firstly encourage ‘mother’ branches along your chosen design lines, then start a system of lateral renewal all along the ‘mother’ branches.
During the winter, shorten those laterals you have chosen to carry the fruit back to 200mm from the ‘mother’ branch, after making sure there are some flower buds on the remaining portion.
Cordons
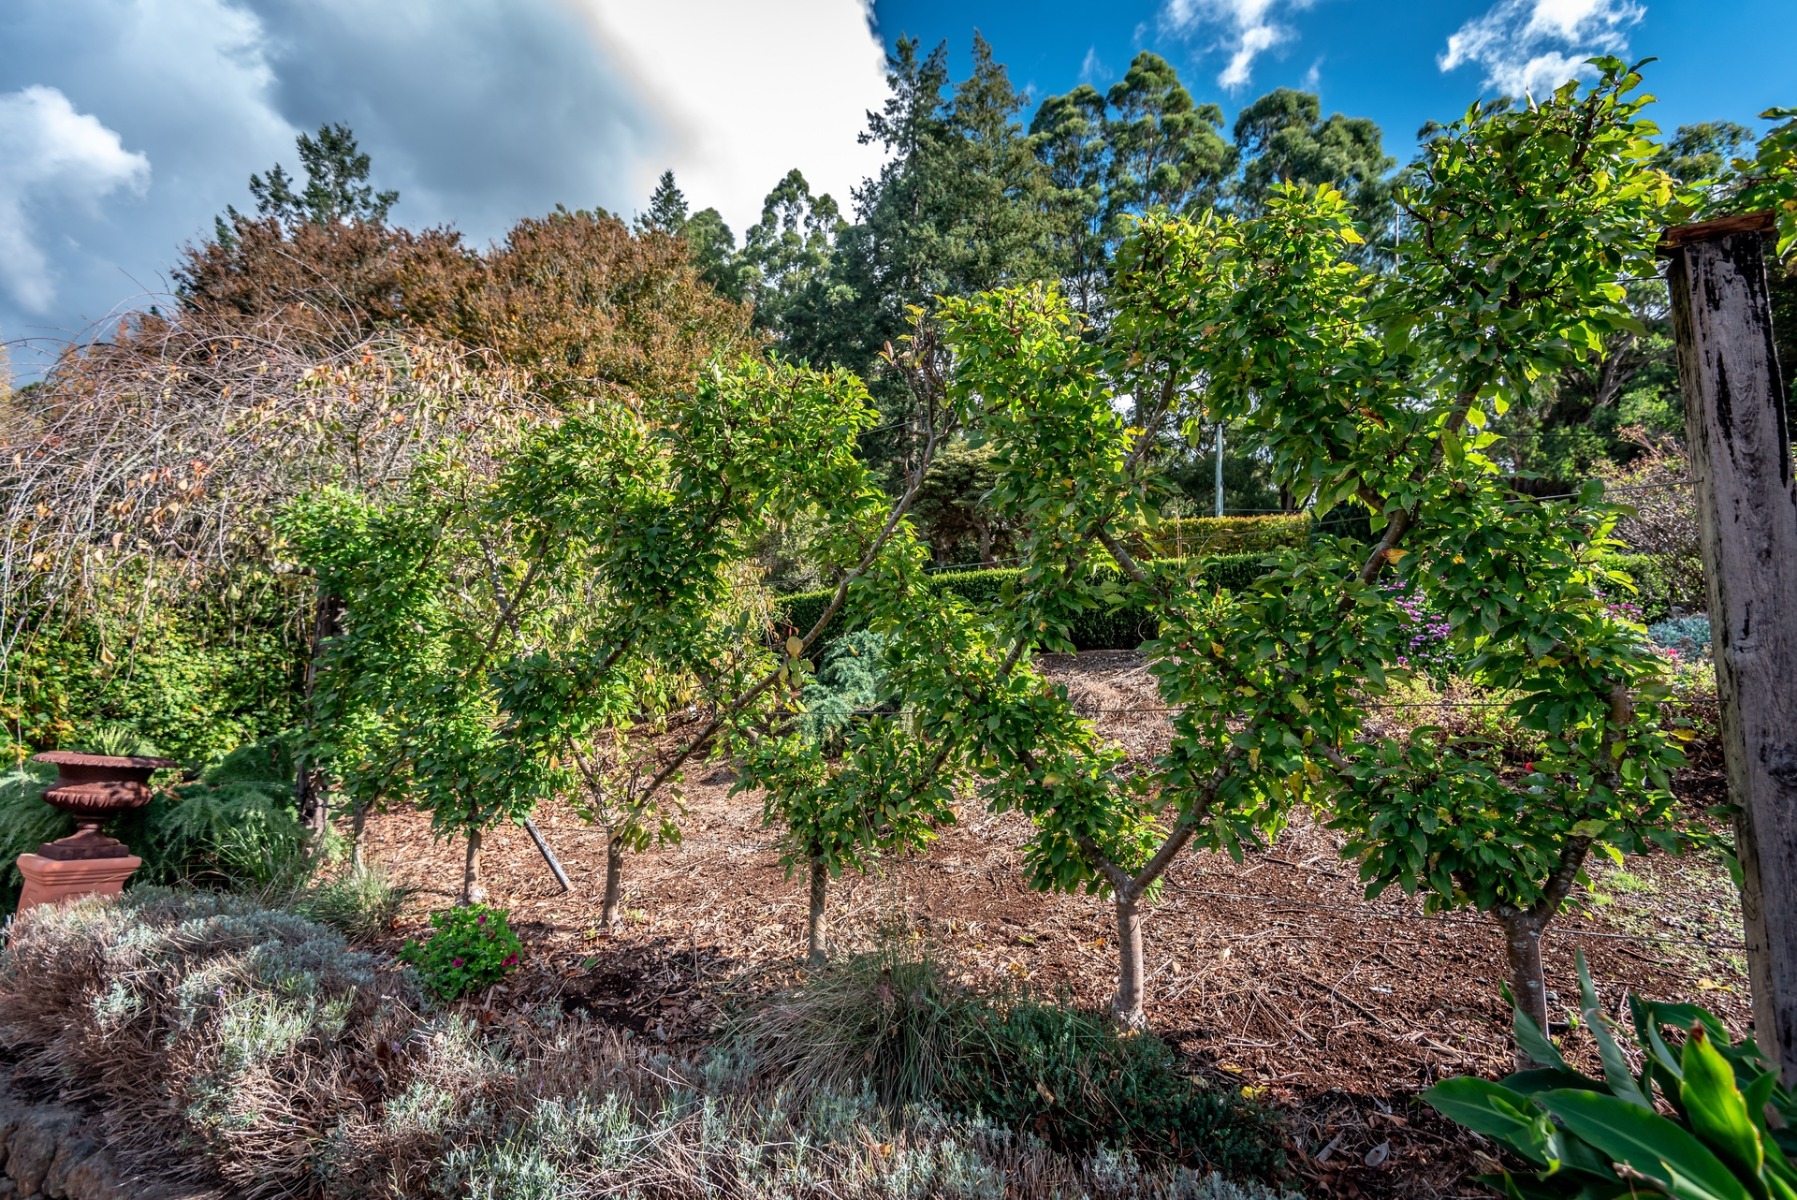
A ‘cordon’ involves training a tree with a single stem. It is excellent for producing many cultivars in a very limited area. If you refer to the lower photograph, you will notice that along a fence area of 4.8metres there are eight apple trees planted, each 600mm apart.
Cordons are planted on a slant and trained up at a 45degree angle. As the trees near the top of the wires they should slowly be trained down gradually to a more horizontal plane until they are completely horizontal along the top wire.